Saturday, May 28, 2011

Red Velvet Cupcakes


I love baking. Cooking, eh occasionally, but baking? Yes please! Perhaps it's because I have a serious sweet tooth... like really serious. I've had dreams about cheesecake, is that weird?

However, I've been told (although I refuse to believe it) that desserts aren't exactly great for you (or your waistline). Okay perhaps I've always know this (but I still refuse to believe it). All I know is that a world without cupcakes is not a world I want to live in.

Since I refuse to give up my treats, I'm always looking for low calorie versions - that actually taste good. And because I'm such a sweetheart I decided to share them with you! So, I plan to regularly post recipes for desserts that are 200 calories (ideally more like 150) or less per serving.

First up are Hungry Girl's Red Velvet Insanity Cupcakes.You can also find the recipe (and a whole lot of more awesomeness in the book: Hungry Girl: 200 Under 200: 200 Recipes Under 200 Calories or at the Hungry Girl Website.


So, make them, eat them, then tell me what you think of them.

Ingredients:
For Frosting
6 tbsp. Jet-Puffed Marshmallow Creme
6 tbsp. Cool Whip Free, thawed
1/4 cup fat-free cream cheese, softened
1 tbsp. Splenda No Calorie Sweetener (granulated)

For Cupcakes
1 cup Pillsbury Moist Supreme Reduced Sugar Cake Mix, Devil's Food
1 cup Pillsbury Moist Supreme Reduced Sugar Cake Mix, Classic Yellow
Two 25-calorie diet hot cocoa mix packets
1/2 cup fat-free liquid egg substitute (like Egg Beaters)
1/4 cup mini semi-sweet chocolate chips, divided
1/2 oz. red food coloring
1 tsp. Splenda No Calorie Sweetener (granulated)
1/8 tsp. salt

Directions:


Preheat oven to 350 degrees
 In a bowl, mix together marshmallow creme, cream cheese, and 1 tbsp. Splenda until smooth. Fold in Cool Whip. Place bowl in the fridge to chill until cupcakes are ready to be frosted.

Place half of your chocolate chips (2 tbsp.) and the contents of both cocoa packets in a tall glass (we didn't have a large enough glass, a bowl worked just as well). Add 1/2 cup of boiling water, and stir until chips and cocoa mix have dissolved. Add  1 cup cold water and mix well.

Pour cocoa mixture into a large mixing bowl. Add the cake mixes, egg substitute, remaining chocolate chips, red food coloring, Splenda, and salt. Using a whisk or fork, mix batter for about 2 minutes (until smooth and blended). Batter will be thin, but don't worry, your cupcakes will puff up once baked!

Line a 12-cup muffin pan with baking cups, and spray lightly with nonstick spray (or simply spray the pan with nonstick spray). Evenly spoon batter into the pan. Place pan in the oven, and bake for 15 - 20 minutes. Cupcakes will look shiny when done. Once cupcakes have cooled completely, evenly spread the frosting over them. Enjoy!

 MAKES 12 SERVINGS


Serving Size: 1 frosted cupcake
Calories: 134
Fat: 3g
Sodium: 266mg
Carbs: 25g
Fiber: 0.75g
Sugars: 11g
Protein: 3g

POINTS® value 3*

Friday, May 27, 2011

My Kid's a Monkey...

...and he has a trophy to prove it.

Riley had his first gymnastics meet this week. It was pretty darn cool (even if the place did smell worse than a boy's locker room after football practice).

He just started in March and I think his ninja skills are coming along nicely.

He won a third place ribbon for the rings.

Second place ribbon for the parallel bars.

And first place for tumbling!

He won second place all-around.


Today, somersaults and cartwheels. Tomorrow, back flips down a dimly lit hallway protecting the world from evil zombie puppies.

(Nobody ever suspects puppies.)

(And I have no idea why they're in a hallway.)


Sunday, May 22, 2011

Fun with Picnik

Last weekend we stopped by the Lyn Lake Street Fest and then walked around for awhile. I was looking through some of the photos I took and decided to play around a little in Picnik. These are my favorites:


Boost Feature


Cross Process Feature


HSL Filter Feature


1960s Feature


No feature, I just like the photo.


Another 1960s Feature


Adjustable Threshold Feature

Monday, May 16, 2011

My Take on the Hardback Sketchbook

It seems like every time I turn on the computer I find another tutorial of a really cool project. Awhile ago I started writing down the ones I wanted to try. Well the list was starting to get pretty long, and I hadn't actually tried any of them yet.

So, I decided I would try out a new tutorial on a regular basis for this blog. It was hard to pick the first one, but I narrowed it down based on two requirements: 1.) I didn't want to have to run to the store, so I had to have all the necessary materials on hand, and 2.) It had to be really easy.

I found the perfect project from Amy over at Angry Chicken. She has a great video showing how to make these super cute sketchbooks.


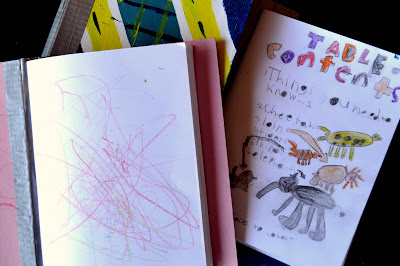
Riley and I had a lot of fun painting these and putting them together. We didn't have any backing board so we just used the backs of some old notebooks. Not nearly as sturdy, but it worked.


Riley is working very hard on his book about endangered animals.


Ava's just starting to show an interest in coloring. I love that I will have all of her first pictures together in this book.


Riley thinks I should use mine for an idea book. I think I just might.


So cute, I have a feeling we will be making a whole bunch more!

And the Winner is...

Thanks to everyone who came and checked out my new blog and especially to those that entered my first giveaway.  

I really appreciate your visits and sweet words so.... I decided to give a pattern to everyone that entered!!!

I'll email you shortly to get the details worked out.

Congratulations and Thanks again!

Friday, May 13, 2011

Ava Gets Her Own Space

When we moved,we sold our house and rented a townhouse. A two bedroom townhouse. We had thought about having Riley and Ava share a room, but decided Riley needed a space to call his own.

So, Ava's in our room. I didn't want it to feel like we just had her stuff in our room; I wanted at least some of the space to feel like hers.


I decided to do some letter paintings to distinguish her area of the room. I knew right away I wanted to match them to the bedding on her crib.


However, this project definitely grew beyond my original idea which was just to have very simple brown letters on a pink background. I also thought they would only be 4x6 or 5x7. Well, that changed when I went to the store. I could only find the smaller sizes individually, but they had a package of ten 8x10s for a fraction of what the smaller sizes would have cost.


Well, now I had the larger sizes, but they were way too big to just have plain pink background. So, I decided to mimic the patterns on her bedding. But, I couldn't decide if I wanted to do the stripes or the circles. So, I just did both. And I'm so glad I did because I absolutely love the way they turned out.


I made stencils for the letters, but just free-handed everything else. At first I thought I would try to have very precise lines and everything, but I did a couple practice ones really quick and loved how loose and natural they looked. They aren't perfect, but I like them even better because of it.


I had so much fun painting these. I was kinda disappointed to be done. I might do something similar for Riley's room, but he's already got a lot going on in there!


What do you think, should I have painted the lines straighter, more uniformed or do you like them a little bit sloppy?

Monday, May 9, 2011

Mother's Day

I hope everyone had a wonderful Mother's Day!

My day began by being "surprised" with breakfast in bed by the hubs and munchkins. (Not really much of a surprise since the day before Riley said he was taking a Mother's Day poll and wanted to know what I would want for breakfast if given the choice.)

Then he gave me this super cute card and clay hanging that he made.

(Apparently his mouth fell off, so he's going to paint a new one on.)


Then Jack decided to take a break from studying for finals so we could go wander around the city. I love just walking around exploring different areas. Considering we're less than 20 minutes from Minneapolis, sometimes it feels like we never do that, so I was super excited.

The only problem with walking around on a Sunday morning is everything is closed. But I still had fun window shopping and taking pics. Here are a few of my favorites:


It's so nice to finally see some flowers!

I really wish this store had been open.


Love this tiny hidden spot.


Do you ever feel like you're being watched?
We walked around for a couple of hours until it started to rain, had some lunch, then I took a nap. Bliss.

So, how was your Mother's Day?

Saturday, May 7, 2011

My First Giveaway!


Thanks for checking out my new blog, I hope you take a look around and check back often.

To celebrate the new blog and the Grand Opening of my new Etsy store: Averly Patterns (formerly Purple Cow Patterns) I decided to have my very first giveaway.

What am I giving away? 2 cross stitch patterns!

How to Enter:

All you need to do is follow my blog (preferably using Google Friend Connect) and just check out Averly Patterns and leave a comment below, telling me your favorite pattern from the store.

The giveaway will end in one week on Sunday, May15th at 7:00 pm CST and 2 lucky readers will be chosen at random.

You don't have to, but if you wanted to tweet/blog etc. about the giveaway I'd really appreciate it!

Good Luck and thanks again for stopping by.

P.S. If you don't want to wait you can use the code GRAND to get 25% off right now.

Friday, May 6, 2011

A Quick Intro to My Etsy Store

As I mentioned before I have an Etsy store that sells cross stitch patterns. I thought I'd give just a quick intro here.


My goal is to offer cool, fun patterns you won't find anywhere else. I like to think my patterns are a little arty and funky.


I started with some old Hollywood classics: Audrey Hepburn, Marilyn Monroe, James Dean and of course, Elvis.


Then I found some chandeliers and became obsessed with them, which began my love for silhouettes in general. What I really like about them is they only use two colors so they're great for beginners, but they also let you customize them by picking which two colors to use. (I keep envisioning a series of 3 or 4 of one of these chandeliers in different colors as a headboard. I will get around to it someday.)


I also fell in love with these floral patterns. They just have such a cool, vintage feel to them. I originally pictured them as wall hangings, but I think they would be really cool as throw pillows too. What do you think?

Okay, that's my quick intro, hope you liked it. I have a bunch more patterns in the store if you want to come check them  out. I'd love to hear what you think of them.